Friday, January 25, 2013

Chocolate Oatmeal Breakfast Cake

So, it's Friday and I'm excited, as always for the weekend to begin. Lately it's been busy here and the task of making a fun, slightly indulgent weekend breakfast has been placed on the back shelf. That, and the fact that it's January - remember those little nuisances, also known as resolutions? Well, they're still going strong in our house and of course, eating healthier is one of them.


So when I came across this recipe for a Chocolate Oatmeal Cake, the wheels started turning. What if I could make this a little healthier? Oatmeal is a big breakfast item at our place and so oatmeal in cake form would be an acceptable breakfast food, no?


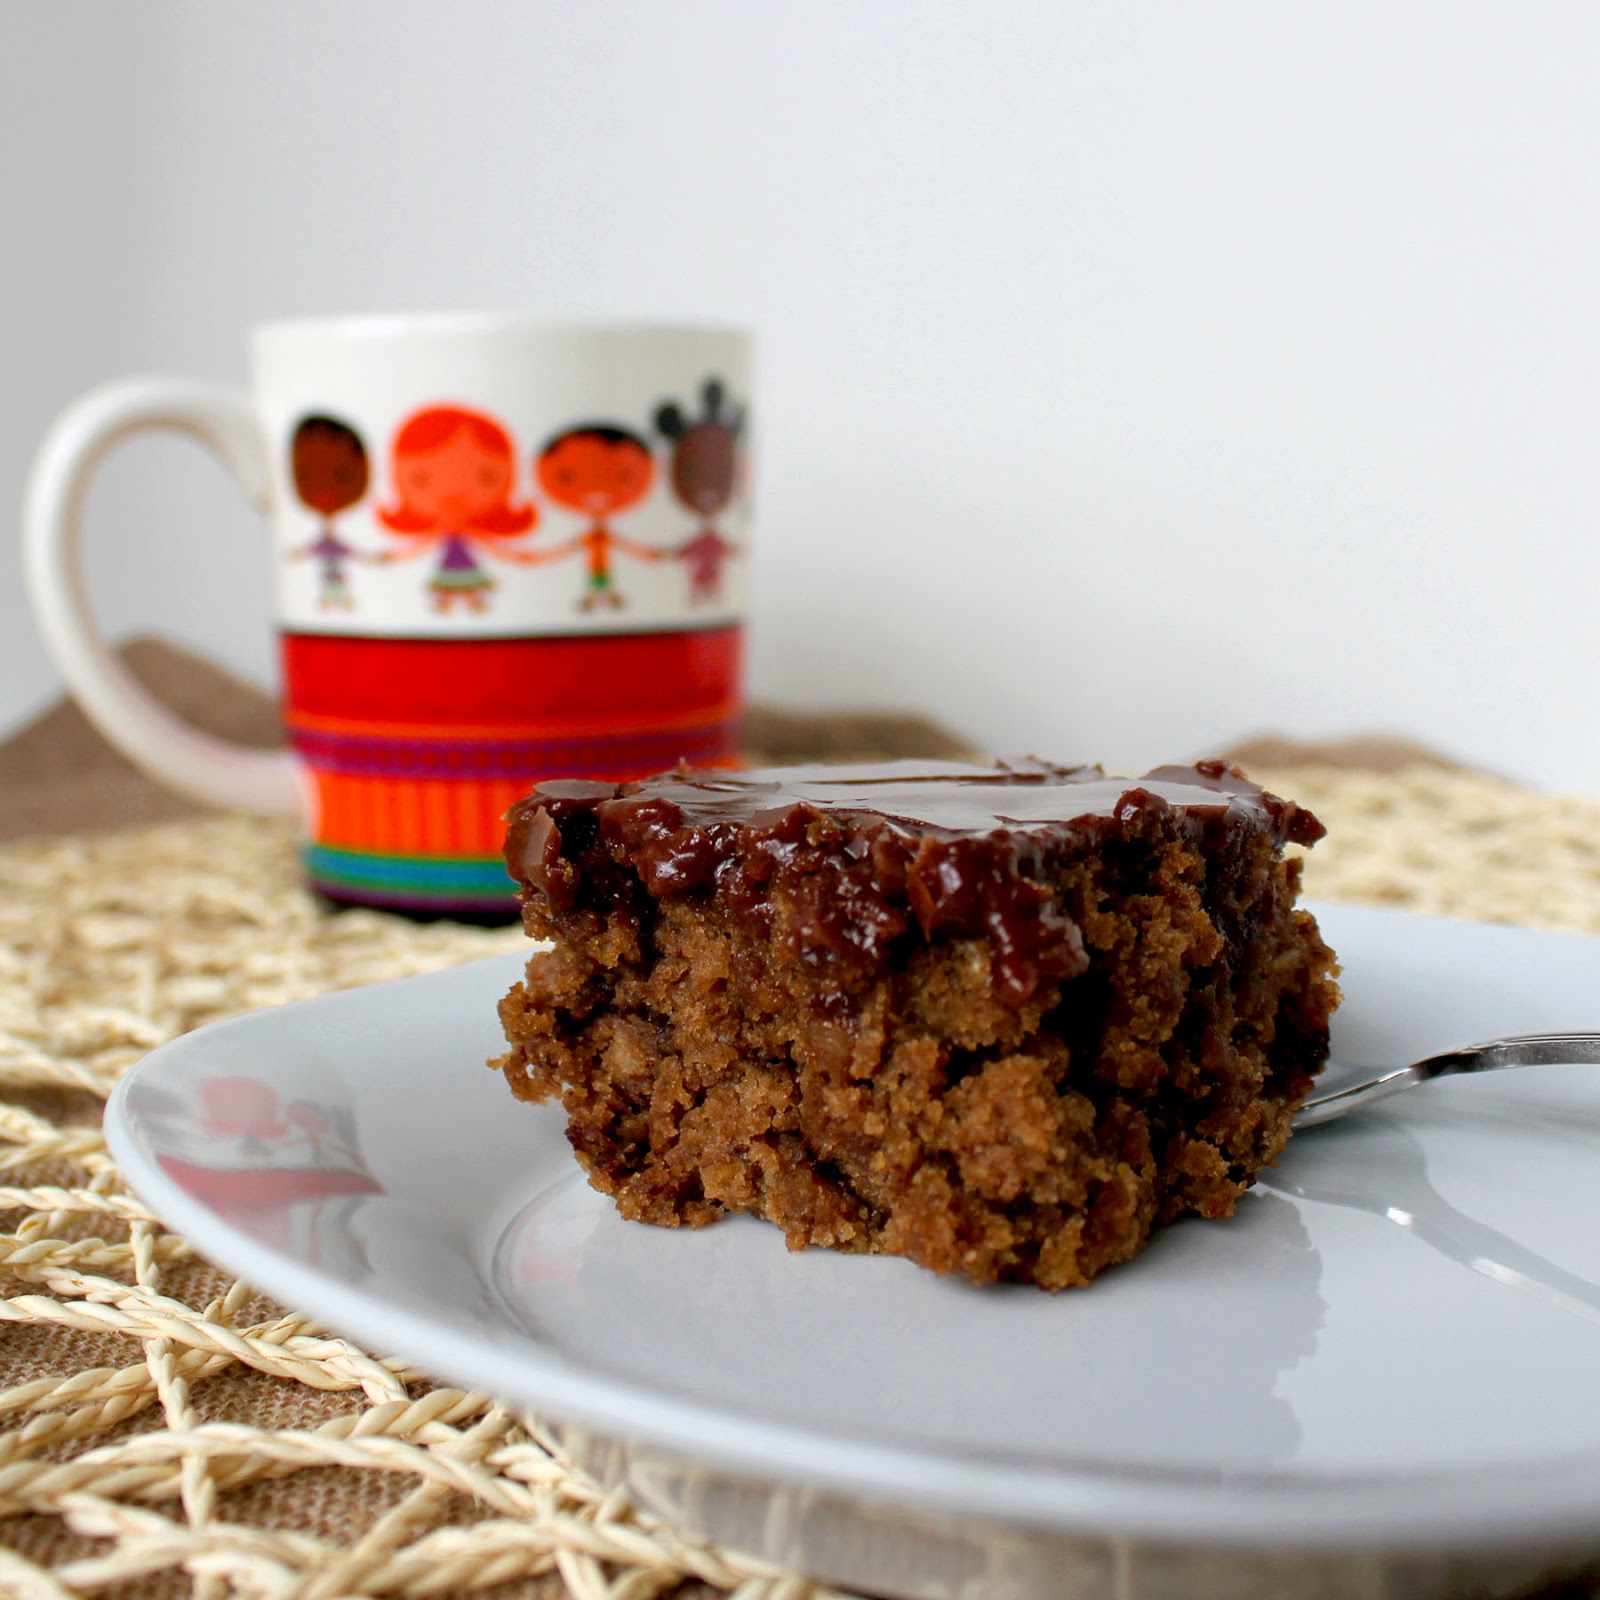
Well, here it is, adjusted and tweaked to satisfy a grumbly tummy on a lazy weekend morning. And don't stop yourself from eating it as a mid-day snack or for dessert? Any time is perfectly acceptable. This cake is moist and dense and filling due to the oatmeal. It's got just enough chocolate and with a smattering of chocolate chips paired with the awesome chocolate topping that falls midway between frosting and glaze, it's healthy goodness. And if I hadn't told you, you wouldn't know it was healthy. It's that good. Don't skimp on the frosting - it takes this cake to the next level. It's got a crackly top but when you break the surface, it's ooey goodness inside. It's quite like that glaze atop a chocolate glazed doughnut. Here, when poured over the warm cake, it soaks into the cake a bit as they cool together, making a perfect match.


If you don't have the wheat germ or flax seed, you can leave them out. The cake will taste the same, only a little less healthy. And if you don't have any applesauce, you can sub 2 T oil.
Have a great weekend! It'll be even better if you start it with this cake!

Chocolate Oatmeal Breakfast Cake
(Inspired by: Pinch of Yum Blog)

Yield: 20 - 24 servings (1 9x13" pan)

Cake:
1 c brown sugar, packed
1/2 c granulated sugar
5 T butter, melted and slightly cooled
2 T applesauce
2 eggs
1 3/4 all purpose flour
2 T cocoa powder
2 T wheat germ
1 T flax seed meal
1/2 t baking soda
1/2 t baking powder
1/2 t salt
prepared oatmeal (1 c quick-cooking oats + 1 3/4 c boiling water + 1/4 cinnamon), softened for 5 minutes

Chocolate Glaze:
4 T butter
1/4 c + 1 T milk
1 c granulated sugar
1/2 c chocolate chips
1 c mini marshmallows

Preheat the oven to 350*F. Grease a 9x13 cake pan. Prepare the oatmeal and set aside. Using an electric mixer (stand or handheld), beat the sugars, butters, and applesauce until well blended. Add the eggs and mix well. In as separate bowl, combine the flour, cocoa, wheat germ, flax seed meal, baking soda, baking powder, and salt. Whisk to combine. Add the dry ingredients into the egg & butter mixture and mix just until combined, being careful to not over mix. Add the prepared oatmeal and mix again to incorporate. Pour the batter into the prepared cake tin and bake for 28-30 minutes or until a toothpick inserted into the middle of the cake comes out clean.
When there are about 10 minutes left for the cake to bake, place the butter, milk, and sugar in a saucepan. Heat over medium heat until the butter is melted and the mixture begins to bubble. Add the chocolate chips and marshmallows and whisk until the mixtures is lump free, everything has melted, and it looks like a chocolate glaze. Continue to whisk this from time to time, as this glaze will set quite quickly.


Take the cake out of the oven and, using your toothpick, poke the cake all over.


Pour the warm glaze over the cake and spread it evenly with a spatula. Let cool completely. Cut the cake into squares and serve. This cake can be store in an airtight container for up to 3 days. 


Saturday, January 19, 2013

Chocolate Chip Cookie Minute Cake

Do you ever get the urge to just eat cake? I do... a lot.


Just the other day, I came home after dropping off my kids at school. It was 10am. My house was empty except for me and my demanding tummy. Knowing that this was cleaning day and I had a limited amount of time to get my cleaning done, I pulled out a ramekin and my whisk, an egg, and a couple of other ingredients. Shameful, I know. But as I knew I could post about it here and help others with similar urges, I felt obligated.


Obviously, I didn't make cake in the traditional sense. It would have taken me at least 45 minutes from start to finish and I was not prepared to wait that long. I wanted cake and I wanted it now.... at 10am on a Thursday morning.
So, I threw together a few key ingredients into a ramekin and microwaved them for a minute. The results were quite impressive for a 1-minute microwaved cake, also known as a "mug cake" to us sugar addicts out there. I wanted a chocolate chip cookie cake in under 2 minutes and that's what I got. When you are making such quick cooked treats as mug cakes, it's important to remember that they can dry out quite quickly. See how moist my cake looks on top? Having made many mug cakes, I've found that this moist, slightly wet-looking top is crucial in producing a moist mug cake. If the top of a mug cake looks dry, the cake inside will be dry as well..
If you have such random dessert cravings as mine, try this recipe. It's delicious, it's moist, slightly gooey (I like mine the slightest bit under-baked), warm and comforting. Studded with chocolate chips and piled high with whipped cream, it's the perfect mid-morning snack. ;-)

Chocolate Chip Cookie Minute Cake

By: Leelabean

Yield: One generous 10-oz serving or 2 5-oz servings

4 T all-purpose flour
2 T light brown sugar
1 T corn syrup
1/4 t baking powder
pinch of salt
3 T unsalted butter, melted & cooled
1 egg
1 t vanilla
2 T chocolate chips

In a small bowl, whisk together the flour, baking powder, sugar and salt. Add the egg, butter, vanilla, and corn syrup and whisk until well combined.


Pour the batter into a microwaveable ramekin (1 10-oz or 2 5-oz).


Sprinkle the chocolate chips over the top of the batter (don't mix it in) and microwave the 10-oz ramekin for 1 minute, closely watching to make sure it doesn't rise over the sides of the bowl while cooking. Depending on the strength of your microwave, you may a little need more or less time. If you need more, microwave in 10 second pulses. If you are using 5-oz ramekins, microwave for 30 seconds, initially, and then in 10 second increments until done. You will know the cake is done when there are small popped bubbles on top, kind of like a pancake that's ready to be flipped. But remember that it should be moist on top. In mug cakes, once the top looks dry, chances are your cake will be overdone and unappealingly dry as well.
Top with a small scoop of vanilla ice cream or some whipped cream and enjoy!

Tuesday, January 15, 2013

A New Blog for a New Year!

Hey everyone!

Have you ever wanted to learn how to bake everything from the very basics to the more involved desserts?
Do you want a site that is comprehensive, concise and chock full of all the recipes you'd ever need to be an awesome, experienced baker?
If this is you, come check out my new blog Leelabean Bakes! It's a blog devoted to teaching the basics of baking with a little education along the way. I will share with you tips and tricks and you can contact me if you ever have any baking questions you want answered.
Each week, we'll go over a different recipe from cakes to cookies, pies to ice cream! As we go along, you'll collect a greater knowledge of baking and recipes for you to wow your friends and family with.
Come check out my new site: Leelabean Bakes! and subscribe to my RSS feed or subscribe to Leelabean Bakes Feed by Email and come with me on this fun confectionery journey!
First up, we all need an all purpose yellow cake recipe. This cake is so versatile and pairs well with so many different accompaniments! Come and get your baking on with Simply Delicious Yellow Cake and get the rundown on some basic cake types on Cakes 101 - A Summary!
Hope to see you all there!

Leelabean

Saturday, January 12, 2013

Chocolate Peanut Butter Cupcakes and Some Exciting News!


I have some news today. In creating resolutions and fresh starts, I took time to go over my blog and what I've achieved with it. As fun as it is to post things that are going on in my kitchen, it is still quite random, the things I decide to bake. I was thinking about how much I've learned over the years and how I've had to visit many different sites to learn baking techniques and tips as well as gather reliable recipes and techniques. 
So this year, in hopes of creating a page solely committed to teaching the art of baking at home, I've created a website, Leelabean Bakes! (www.leelabeanbakes.com/blog). This website's blog will offer up an outline of basic baking methods, techniques, tips, tricks, and recipes. Think of it as a how-to guide, Baking 101. I hope to provide readers with knowledge of various desserts as well as the successful techniques to create them in their own homes. Please come and join me and each week, we'll go over a different recipe. By the end of the year, you should have a substantial collection of reliable, delicious recipes under your belt as well as a comprehensive website that can help you find any information you need pertaining to baking! Join me next week in my kitchen as I bake a simple delicious yellow cake that is fit for any occasion!
Leelabean Cakes will continue to be posting as it has always been, so subscribe to both sites to keep up on it all!

 
Now, onto my post - yesterday, I made some cupcakes. I was in the mood for chocolate, so I used one of my favorite recipes and topped it with a luscious peanut butter Swiss meringue buttercream, mmm dreamy creamy!


 But that's not all! Before I topped my cupcakes with the buttercream, I filled them with thick, rich caramel. If you love peanut butter and caramel, this cupcake is for you!


Below, you'll find the recipe. The caramel can be a store-bought one for ease of preparation. The Swiss Meringue Buttercream will work if you follow the recipe exactly as stated. Good luck and enjoy!

Chocolate Caramel Cupcakes with Peanut Butter Swiss Meringue Buttercream


By: Leelabean

Yield: 2 dozen cupcakes

Chocolate Cake:
 2 1/4 c all purpose flour
1 c cocoa powder
3/4 c granulated sugar
3/4 c light brown sugar
2 t baking soda
1/4 t cinnamon (optional)
1/2 t salt
1 1/4 c buttermilk
1/2 c + 2T canola oil
2 lg eggs, RT
1 T vanilla
1 t chocolate extract (optional)
1 c prepared strong coffee (made by mixing 2 t instant coffee + 1 c warm water)

Peanut Butter Swiss Meringue Buttercream:
7 egg whites or 250g (I use egg whites that come in a carton, so it's easy to measure out by weight)
400g granulated white sugar
5 sticks butter, cut into pieces, cool room temperature
1 T vanilla
1/8 t salt
3/4 c smooth peanut butter

Caramel sauce, prepared
honey roasted peanuts, crushed

Making the cupcakes:
Line a muffin tin with cupcake liners. Preheat your oven to 350*F.
In the bowl of your stand mixer, combine all the dry ingredients (flour, cocoa powder, sugars, baking soda, cinnamon (if using), and salt. Using a flat beater, combine the ingredients for a few seconds. Add the oil followed by the buttermilk and beat on medium to medium high for about 1 1/2 to 2 minutes. The mixture will become a little lighter and airier as air becomes incorporated it.
In a separate container, combine the eggs, vanilla, and prepared coffee. Whisk a bit to blend. Then pour the egg/coffee mixture into the bowl of the stand mixture and mix the batter until all of the ingredients are well incorporated and uniform in consistency. Make sure to scrape the sides of the bowl while doing this. The consistency of the batter will be very thin - kind of like a very thick buttermilk. Pour the batter into the prepared muffin tin liners about 2/3 full. Bake for 20-22 minutes or until a toothpick inserted into a cupcake comes up clean.
Let these cool on a wire rack until you are ready to fill them.

Making the buttercream:
In a clean (no grease, whatsoever) bowl of your stand mixer, place the egg whites and sugar. Place it over a bain-marie on your stove and let the water come to a simmer, gently whisking the egg-sugar mixture. Bain-marie is just a French term meaning to heat something up using indirect heat from boiling water. When the egg mixture reaches 140*F, take it off the bain-marie and attache it to your stand mixer. Beat the whites with the whip attachment until tripled in volume, resembling a white fluffy meringue cloud. Cool the meringue as it is whipping. I like to place bags of frozen vegetables around the base of my mixer to aid in the cooling process.
Once the meringue is completely cooled to room temperature, switch to the paddle attachment and add your butter piece by piece until all of it is added. It may look soupy or curdled along the way but ultimately it will come together. Add the vanilla and salt and peanut butter and mix until incorporated. Place the stand mixer bowl holding your frosting in your fridge if you are planning on frosting the cupcakes within the hour. If you plan on frosting much later, keep your frosting in an airtight container in the refrigerator. When you are ready to use it, place the contents into the bowl of your stand mixer and beat it all together again until the it is the consistency of buttercream.

Cupcake assembly:
Using an small spoon, dig out a hole into each cupcake. This is where the caramel will sit. Eat the scraps. You deserve it. :-) Then, using a teaspoon, slowly spoon the caramel into each cupcake until it is flush with the top of the cupcakes. Place your frosting in a bag with a decorative tip and pipe a swirl atop each cupcake. Top the cupcakes with the crushed honey roasted peanuts. Enjoy with a tall glass of milk!