Sunday, August 26, 2012

Nutty Cake Truffles

After the recent huge success of Cake Pops, you can find these sugary sweet items everywhere in literally any shape or form! They are adorable confections that can be personalized or decorated to suit any occasion. Kids absolutely love them as kids do of most sugar-laden treats. They're quite lovely in their imaginatively created forms. But for me, while visually appealing, they are a bit too sweet on the palate. This comes from a self-proclaimed dessert lover, someone who needs to have a sweet something at least once a day at each meal.
As I've said many times before, I regularly have bowlfuls of leftover cake and frosting from my projects and as you know, I love to repurpose and reuse in an effort to waste as little as possible - even if it's cake and frosting. I saw a staggering number just a few days ago - 40% of food is wasted in the US! According to this study, 25% of groceries we buy is inevitably thrown out.
While cake pops seem the likely way to use up all this excess cake and frosting, I decided to try something slightly different and a few weeks ago, an opportunity presented itself. I had a few containers full of chocolate, vanilla, and strawberry cake and leftover frosting from my sister-in-law's graduation party cake. So I mixed the cake (yep, all three flavors) and frosting, which happened to be vanilla buttercream. Then I made balls 1 1/2" in diameter from this mixture and refrigerated them for about 15 minutes. Meanwhile, I chopped some walnuts and pecans finely. When the cake balls were firm, I rolled them in the chopped nuts. The resulting cake balls were delicious! Just enough sweet with a nice crunch. There was also a nice depth of flavors from the cake, frosting and nuts that doesn't happen too often in cake pops.


I've deemed these babies Nutty Cake Truffles and they are a welcome change for me, from the current cake pops. It's also easier to feel a bit healthier eating these cake truffles. I mean, nuts - come on!? Super healthy! :-)
Admittedly, you cannot form these Nutty Cake Truffles into cute little bears or cars or Hello Kitties on a stick, but for the adults (and kids too - my kids devoured these truffles within seconds of giving it to them!) they are yummy, portable and flavorful - an easy snack or dessert. Cake pops certainly have their place in the dessert world, but these Nutty Cake Truffles are a great alternative that's quick and delicious and totally addictive.


Nutty Cake Truffles

3 parts cake crumbs (any flavor)
1 part leftover frosting (any flavor)
nuts, chopped finely (any kind will do)

Mix the cake crumbs and frosting in a bowl until well combined (I use my hands, super clean, of course). The ratio of cake to frosting should result in a cookie-dough like consistency, so add more cake or frosting as necessary. If you don't have any more of either cake or frosting, and your mixture is too loose, refrigerate it for about 30 minutes. Roll the mixture into about 1 1/2" diameter balls for a two-bite treat. Place them on a parchment-lined cookie sheet and refrigerate for 10-15 minutes. Take the tray out of the fridge and roll each cake ball in the chopped nuts (you may have to roll with some pressure to have the nuts stick to the cake balls).
Refrigerate in an airtight container for up to 5 days.

Saturday, August 18, 2012

Sweet Cinnamon Sugar Croutons

My kids aren't big salad eaters, but they love croutons, especially homemade ones. They are so easy to make and require little or no thought, so any chance I get, I make a batch. Often when we buy baguettes, we are left with bread the next day, which is ideal for crouton-making.
The other day, I thought to myself that while savory croutons in their buttery, salty way seem to always hit the spot, wouldn't a sweet version be amazing too? Cinnamon sugar was on my mind and I decided to give it a go.


I must say, these cinnamon sugar croutons are ah-mazing alone, but even more so appropriately nestled in a bowl of creamy pudding (I've used storebought, here) with whipped cream. They pair so well with smooth, lucious desserts - the crunch being a nice contrast in textures.


It's even possible to make these croutons and then use them as the base of a heavenly bread pudding on a cool fall morning (a post to come on this idea). Or for breakfast, you could top some vanilla yogurt with fresh fruit and sprinkle some of these crushed croutons on top. The possibilities are truly endless.


Here's how to make them:

Sweet Croutons
(Created by Leelabean)

1 leftover baguette (at least 1 day old - make sure the bread has lost some of its moisture for a crispier crouton. If not, leave it out uncovered for a few hours)
1/4 c light olive oil
1/4 c unsalted butter, melted & cooled
1/2 c cinnamon sugar, see below for recipe

Preheat your oven to 375F. Prepare a baking sheet by covering it with aluminum foil for easy cleanup.
Cut the baguette into small 1" cubes and set aside. Combine the butter and light olive oil. Make sure not to use anything stronger than light olive oil as the croutons will then have an olive oil flavor. Spread your bread cubes on the prepared baking sheet and drizzle the olive oil/butter mixture on top. Toss to evenly distribute the oil/butter mix. Sprinkle 1/2 c cinnamon sugar on top of the cube and toss again to cover as much of the bread as possible with the sugar. Spread the cubes evenly on the baking sheet making sure there is only one layer of bread.
Bake in the preheated oven for 8-12 minutes or until the bread has browned along the edges. Let cool completely and store in an airtight container for up to 2 weeks.

Cinnamon Sugar

2 t cinnamon, ground
1/2 c sugar

Combine both ingredients well and store in an airtight container.

Monday, August 13, 2012

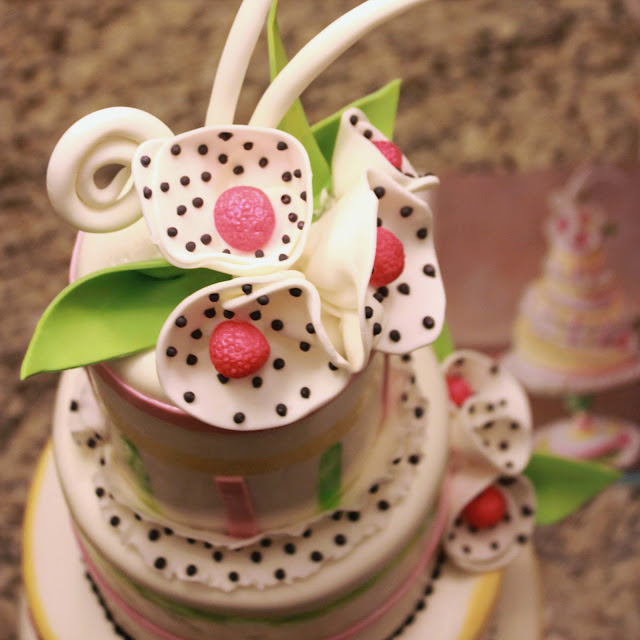
Celebration Cakes: A Special Graduation Cake

When I married my husband, I inherited three sisters-in-law. They are all beautiful, each with their own loveable personality. The middle one, Allison, graduated from college this year with flying colors. When I first met her a mere 18 years ago (!!), she was a cute, spunky little toddler with loads of energy. I have watched her grow up over the past nearly two decades and she has become a strong woman with a tough-as-nails shell and a heart of gold. That energy still runs rampant in her now, but is more purposefully channeled into running, which she does quite amazingly well, coming first in dozens of races. She is one-of-a-kind, very special and someone I am extremely proud to know and call my sister.


So, when I heard plans being made for a graduation party, I immediately wanted to make a cake celebrating her. If Allison were a cake, what would she be? This cake had to be her - feminine but not overly so, with an edge and a little spunk - strong and bold with a soft side.


I found inspiration in one of Collette Peter's books, Cakes to Dream On: A Master Class in Decorating. The Torte of Babylon was exactly what I was looking for.


Making such a large cake takes weeks if you want to maintain your sanity. Doing things in steps, with lots of time in between for things to set and dry as necessary, is crucial. This was the largest cake I've made to date. It served 75-80 people very well and it consisted of 4 tiers - each was 3 layers of cake. The three layers were chocolate, strawberry, and vanilla (a neapolitan cake) sandwiching strawberry jam. Each tier was covered in buttercream and then a layer of fondant. Using strawberry jam instead of buttercream between the layers was a huge success because the cake was not overly sweet. The layers of cake were the stars rather than an overpowering buttercream. In making cakes, it's so very important to regulate the sweetness of the cake through its parts. If a cake is too sweet, it is often hard to eat and takes away from any flavor the cake may have.

The homemade jam that I had tucked away in my pantry ended up being a bit thin for the cake so I used a storebought jam as I didn't have strawberries or the time to make up another batch. Other than that, everything was homemade from the fondant to the cake layers. Whenever I bake and decorate, even grand pieces such as this one, I always use fresh ingredients and make everything myself. Like I always say - homemade is much better than storebought, both for taste and healthfulness.


I had to empty out a good portion of my refrigerator to fit the assembled cake the night before the party. As you can see, it took up a great deal of space!


This cake had to be taken on a 2-hour trip to Long Island on a very muggy and hot summer day. The top tier was removed for stability during transport. I reassembled the cake successfully once we arrived at the party locale.

With my husband's help, I had created a pedestal which coordinated with the cake, but was unable to use it as the cake ended up being too heavy to be supported by it. It did serve a purpose though, as a resting spot for each tier as I took each off to slice and serve to the guests.

It was such a fun party and the cake was so worth the effort it took to make it! Everyone loved it, and I was thrilled to be able to add a little something memorable to Allison's already special day.


We wish you all the best in every endeavor you take from here on in. Reach for the stars! We love you!

Wednesday, August 8, 2012

Kid Bites: Creamy-Cheesy Frosted Easy-Peasy Mini Carrot Cupcakes

Summer finds us always looking for fun and creative ways to spend the days - often times inside from the sweltering East Coast heat. One pastime that is loved by my kids (I wonder why...?) is baking and moreso, decorating baked goods.


So the other day, we made mini carrot cupcakes and decorated them with cream cheese frosting. Preparation of the carrot cake was easy, and my eager kids did most of it - from grating the carrots, to weighing the ingredients - while I sat back and thought about how much time it would take me to clean up this mess that was unfolding right before my very eyes! Workspace was limited to my kitchen island, so things didn't get too out of hand.


When it came time to frost, I pulled out a good assortment of tips, gave each kid a bag of frosting and let their imaginations take the helm. It was great to see them tryout out different tips and trying to create their own little masterpieces. My son piped out an interesting abstract version of a dinosaur while my daughter made beautiful flowers.


Try these carrot cake cupcakes with your kids. You'll create a fun-filled memory they'll never forget and you'll have dessert ready for that evening, too!


Easy-Peasy Mini Carrot Cupcakes with Creamy-Cheesy Frosting
(modified from The French Culinary Institute's The Fundamental Techniques of Classic Pastry Arts Carrot Cake recipe)

Yield: ~24 mini cupcakes

Cupcakes:
1/2 cup cake flour
1/2 t ground cinnamon
1/4 t baking powder
1/4 t baking soda
1/4 t salt
1 large egg, room temperature
1/3 c granulated sugar
1/4 c canola oil
1 c grated carrots
1/2 c chopped walnuts (optional)

Place mini muffin liners in a 24-cavity mini-muffin tin and set aside.
Preheat your oven to 350F.
In a medium bowl, combine the cake flour, cinnamon, baking powder, baking soda and salt. In another bowl, whisk the egg until it's broken up. Then add the sugar, canola oil, and grated carrots. Mix well. Combine the wet and dry ingredients and fold the dry ingredients into the wet. Next, add the carrots and fold in gently being careful not to overmix. Lastly, fold the chopped walnuts into the batter if you are using them.
Using a tablespoon-sized cookie scoop, place one scoop of batter in each mini muffin liner. The batter should come half-way up the sides of the liners. This amount will produce a nice dome-like top to your cupcakes - perfect for frosting.
Bake these cupcakes for 15-20 minutes. A toothpick tester will come out clean when they are ready to come out of the oven. Take the cupcakes out of the tin and let them cool completely.
Meanwhile, let's make the frosting:

Frosting:
1 8-oz package cream cheese, room temperature
1/2 stick (4 T) unsalted butter, room temperature
1 c confectioners' sugar
1 1/2 t vanilla extract
1/4 t lemon zest
Milk
Extra confectioners' sugar

In a bowl, using an electric beater, beat the cream cheese and butter until well combined. Using a slow speed on the beater, start adding the confectioners' sugar. When it's all been added, turn up the speed and beat for 2 minutes. Add the vanilla extract and lemon zest and beat for another minute. Depending on the consistency of frosting you are trying to achieve, you may add milk (to loosen) or confectioners' sugar (to thicken), one tablespoon at a time. Frost the cupcakes.

Store these cupcakes in an airtight container in the refrigerator for up to 5 days.

Friday, August 3, 2012

Low-Carb Cheesecake

I tend to follow a low-carb diet. After years of trying to figure out what type of diet worked best for me, I determined that a high-protein, low-carbohydrate one was most beneficial. It provides me with energy without any sluggishness and that uncomfortably stuffed feeling that is so indicative of high-carb foods such as rice, pasta, bread, and potatoes. I get full without feeling full.
There is some controversy over low-carb and low-fat diets. If you are interested in trying out a low-carb diet, read this and this and this.
Eating low-carb meals is not difficult. You basically have the same food as everyone else, omitting the pasta, rice, bread, or other grain as well as any potatoes or other starchy ingredients. Pile your plate high with protein and veggies and you're set.
The problem arises when you consider desserts. Flour and sugar, the two key ingredients in baking, are both loaded with carbohydrates. But there are ways of following a low-carb diet and eating your dessert too!
Cheesecake happens to be a perfect low-carb dessert as it needs no flour and is made with cream cheese, which is a high-protein, low-carb food.


Below is a recipe for a whipped, no-bake, low-carb cheesecake that is delicious, filling and perfect for even those non-low-carb eaters..! It's great paired with berries (another low-carb option) or a swirled pouf of whipped cream sweetened with Splenda.
I've used a nut base rather than the typical graham cracker/cookie crumb crust and the cheesecake is sweetened with Splenda rather than sugar. I've also thrown in a handful of Oreo cookies just for flavor, but not too much to pile on the carbs. Of course, the Oreo cookies can be left out of this recipe and the cheesecake would be just as delightful! With the Oreos, the carbohydrate count is 8.1g per slice based on an 8-slice cheesecake. Without them, it is 3.6g. Personally, I think the extra 4.5g carbs are totally worth it for a once-in-a-while splurge without any guilt.


If you ever want to calculate the nutritional value of a recipe, check out the recipe analysis page on Calorie Count. It's user-friendly design accepts recipes as written and produces a quick, informative nutritional analysis faster than you can pull out your calculator.
The fact that this dessert is no-bake makes it a wonderful summer dessert option because who wants to turn on their oven in these hot summer months? This cheesecake is also much lighter than its traditional baked cousin. Try it if you want a refreshing airy dessert that satisfies all of your dessert cravings..!


No-Bake Low-Carb Cheesecake
(Created by Leelabean)

For the filling:
16 oz (2 blocks) cream cheese, softened
3/4 c heavy whipping cream
1/4 c water
1 1/2 t gelatin, powdered
1 c Splenda (or another low-carb sweetner)
2 t vanilla
5 Oreo cookies, crushed (optional)

For the crust:
2 T unsalted butter, melted
1/4 c walnuts, ground
1/2 c almonds, ground

Spray an 8" springform pan with non-stick cooking spray.
Sprinkle the gelatin over 1/4 c water in a small microwaveable bowl. Set it aside for about 5 minutes.
Using an electric mixer, beat the cream cheese until is it smooth and lump-free. Add your whipping cream and beat, first slowly, then increasing the speed once the cream cheese has been incorporated, so that the whipping cream starts to thicken.
Meanwhile, microwave the gelatin and water mixture for about 10-15 seconds, keeping an eye on it so it doesn't bubble over. Once warmed, the gelatin will be smooth and flowing. Pour this into the cream cheese mixture. Beat well. Spoon the Splenda into the cream cheese mixture, followed by the vanilla. Blend on medium high so as to dissolve the Splenda and create a smooth filling. Scrape down the sides of your bowl and continue to mix until you have a homogeneous filling. Fold the crushed Oreos into this filling if you are using them.

In a separate bowl, combine the butter with the ground walnuts and the ground almonds. Mix until you have a paste-like consistency. With moistened hands, carefully pat down a thin layer of the nut mixture into the base of the prepared 8" springform pan. Pour the filling onto the base and tap the pan a few times on the counter to eliminate any air pockets that may have formed during pouring. Smooth the top with an offset spatula. Loosely cover the cheesecake with plastic wrap and refrigerate it for at least 2 hours before serving.
This cheesecake will last in your refrigerator for about 5 days, covered in plastic wrap.