Hi friends,
As the new year comes to a close, I wanted to take a moment to tell you all how awesome you've been in supporting this baking and blogging endeavor I've been on this past year. It's been a great ride for me, but undoubtedly wouldn't have been as such without all of my friends and family there to sustain me.
My husband's honest critique of everything that comes out of my oven helps me more than anything else. We all need someone in our lives to tell it like it is. And he's my guy. As much as what he says may not always be what I want to hear, it's what I need to hear and that is priceless. Thanks, J.
My children are awesome, the best kids a girl could want. They've been patient through all my baking hours logged in the kitchen and so supportive (my daughter is constantly advertising my goods in school and my son constantly tells me my cakes are the BEST)...! Thanks, kids. It means a lot.
As 2012 approaches, my blog hits are nearing 1000 and after these couple of post will most probably excede 1000. Thank you all for making my blog a part of your days. I hope you enjoy reading it as much as I enjoy maintaining and adding to it. I love being in the kitchen and creating fun, creative and delicious treats and I'm so glad I've friends to share that with. Hopefully this next year in the kitchen will be as fun and exciting as the past one has been and I hope to share those moments with you as well.
So as the year closes on us, I wish all of you and your families a very Happy New Year in 2012 and much love, happiness, good health, prosperity, and peace in spirit.
Love,
Leelabean
Saturday, December 31, 2011
A Smashing Birthday!
It's the week between Christmas and New Year's - a time for thinking back on the year past and pondering the year ahead. It's a time for celebration, enjoying the warm holidays and ringing in the new year. In my world, along with all this, it's also creating two cakes for some friends' birthdays being celebrated this week.
The first was a Lego cake for some family friends whose sweet and dear 1-year old absolutely adores these fun building blocks. The birthday boy's mom, Carolyn, is a photographer with her own blog and business. Please check her page out, as she is extraordinarily talented! She photographed our family recently and I just adore every single picture she took! I will be posting some pics from our photoshoot very soon so check back for that.
The cake was a first for me in that it had to be egg-, dairy- and nut-free, not to mention I had never designed a Lego cake before.
I created a carrot cake recipe which used flax seed as a replacement for eggs. Flax seed meal is a great alternative to using eggs in baking. One heaping tablespoon of flax seed meal blended with 1/4 cup of cold water until it becomes the consistency of a beaten egg (about 2 to 3 minutes) is the way to use this substitution. My friend wanted a smash cake for her son - a mini-spin off of the larger cake. If you've never heard of smash cakes, they are mini cakes that are created, usually for 1st birthday parties, so the birthday boy or girl can enjoy his or her piece of cake without destroying the actual cake. Most often, they are mini, complementing versions of the larger cake.

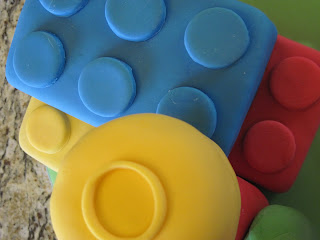
This cake, while my toughest project yet, was still fun to make. I enjoyed determining the logistical assembly of the Lego man and the building blocks. The carrot cake tasted delicious, so I was happy to use it rather than the more standard vanilla or chocolate.
During this process, I confirmed without any hesitation that I am my toughest critic. The moments leading up to the presentation of your cake are always a bit stressful, in anticipation of everyone's reactions. All my worries were unfounded. When I revealed the cakes, they expressed such joy and excitement that clearly I had been overreacting.
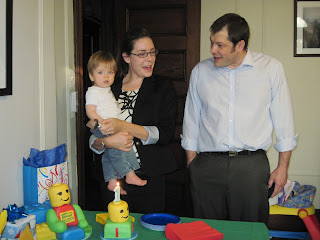

I was so thrilled to have had made this sweet little boy's first birthday cakes and so honored that my friends wanted me to do it for them. Furthermore, I was elated to see the delight in my friends' faces when they saw and then ate the cake. This is why I do what I do. Happy 1st Birthday, Elliott! We love you.

Thursday, December 22, 2011
Cookie Swap Recipe: Dulce de Leche Sandwich Cookies
I'd have to say the crowning achievement of my cookie swap selection had to be this last cookie I am bringing to you. It's two dulce de leche cookies with a slather of creamy dulce de leche in between. Dulce de leche is similar to caramel. Where caramel is a concentrated sugar-water solution, dulce de leche is a concentrated sugar-milk solution. The result is a creamier more flavorful caramel that is the perfect accompaniment to most anything - cookies, cakes, fruit, a spoon.... Moreover, it's a complete cinch to pull together. Buy yourself a can of sweetened condensed milk. Open it. Pour it into an oven-safe casserole dish. Cover it tightly with aluminum foil. Set your oven to 425F. Put the condensed milk casserole dish into a larger, deeper oven-proof pan and fill this outer pan 1/2 way up the side of the smaller casserole with boiling water. Please be careful doing this. I usually pull out the rack in my oven half-way and put everything together there and then just slide in the rack when it's ready to bake.
Bake this for 1 1/2 to 2 hours. Replenish the water as necessary, keeping the level half-way up the side of the smaller dish. You will see the condensed milk become a caramel color. This is dulce de leche! It's that simple. Take out the dulce de leche and whisk fairly vigorously so as not to have a lumpy sauce. Let it cool completely and it can be stored in the refrigerator for up to one week. Alternately, you can purchase dulce de leche at your grocery store.
The dulce de leche sandwich cookies are one of the many things you can make with your dulce de leche. The cookie is fabulous on its own, but sprinkle a little sea salt before sandwiching each cookie and this cookie goes from fabulous to out of this world!

Dulce de Leche Sandwich Cookies
(Recipe from Baking: From My Home to Yours, Dorie Greenspan)
Ingredients:
2 1/2 c all-purpose flour
1 t baking soda
1/4 t salt
2 sticks (8 ounces) unsalted butter, room temperature
3/4 c dulce de leche, plus more for filling
3/4 c packed light brown sugar
1/2 c sugar
2 large eggs
Directions:
Preheat oven to 350oF and position a rack in the upper third of the oven. Line two baking sheets with parchment paper and set aside. In a medium bowl, whisk together the flour, baking soda and salt.
In the bowl of a stand mixer fit with a paddle attachment, beat the butter at medium speed until just softened and broken up a bit. Add the 3/4 c dulce de leche, brown sugar and granulated sugar. Beat on medium speed until light and fluffy, about 3 minutes. Add the eggs one at a time, beating to incorporate.
Reduce the mixer speed to low and add the dry ingredients all at once. Mix only until the flour is just incorporated. You may need to finish off the mixing with a big spatula.
Spoon the dough onto the lined baking sheets using a heaping teaspoon of dough for each cookie. The dough will be soft and this might be a bit messy. Leave 2 inches of space between each cookie.
Bake the cookies for 10 to 12 minutes. The cookies will be honey brown with a light crust, but still very soft when they come out of the oven. Let them rest on the cookie sheet for a minute or two before removing to cool.
Once the cookies are cooled completely, spread them with dulce de leche. You may sprinkle with sea salt (optional). Sandwich the cookies. Keep well wrapped for up to four days.
*How to make Dulce de Leche:
Set your oven to 425oF. Empty the contents of a can of condensed milk into an oven-proof casserole dish and cover tightly with aluminum foil. Place this dish within a larger dish with raised sides and fill the larger dish with water at least 1/2-way up the sides of the dish with condensed milk, providing a water bath for the condensed milk. Put this into the oven and bake for 1 1/2 to 2 hours. Replenish the water as necessary. When you take out the dulce de leche (remember, it will be very hot so be careful, especially when pulling the foil off!), whisk it for a few minutes until it becomes smooth. This may be stored in the fridge for up to 1 week.
Thursday, December 15, 2011
Cookie Swap Recipe: Rugelach
Hey everybody. So, you'll remember a few days ago I posted about my Cranberry White Chocolate Biscotti from my Cookie Swap last week. Well, here's the second cookie I baked for this fun party.
Looking for a nut-free Christmas cookie, or rather 3, was quite a challenge. Many of you well know that most cookies, especially around this time of year have some sort of nut component in them. But I wanted all my guests (including my nut-allergy ones) to be able to try all the cookies, so that was one of the rules that I made sure I put forth.
After poring through many cookbooks, I decided upon rugelach. Rugelach is a traditional Jewish cookie. It's got a flaky cream cheese based crust and its filling is usually some combination of cinnamon, nuts, chocolate, raisins and fruit preserves.
I made them omitting the nuts and with a chocolate, cinnamon and apricot preserve filling. I think they came out quite well and were a delicious addition to my cookie swap table.

Dough
2 1/2 c AP flour
1 1/2 T sugar
1/4 t salt
16 T unsalted butter, cut and chilled
8 oz cc, cut and chilled
2 T sour cream
Filling
1 c sugar
1 T ground cinnamon
2/3 c apricot preserves, processed smooth
1 c dark chocolate, chopped finely
Glaze
2 lg egg yolks
2 T milk
For the Dough-
Combine the flour, sugar in the bowl of your stand mixer or food processor. A food processor works better, but either will do the job well. Add the butter, cream cheese, and sour cream and carefully combine until the dough becomes crumbly – the size of cottage cheese. Do not over-mix this dough. If you do, it will not be flaky and pastry-like once baked. Place the dough on a clean counter space divide it into 4 equal portions. Press each one into a disk and then, using wax paper to sandwich the dough, roll it out to a rectangle about 9” long x 6” wide or until the dough is about 1/8” thick. Place in the freezer for 30 min. Alternately, you can make this dough ahead of time and store it in the freezer, tightly wrapped, at this stage until you need to make the cookies. The dough can be frozen at this point for up to a month.
For the Filling-
Combine the sugar and cinnamon. Remove the dough from the freezer and spread 2 T preserves, 1/4 c chopped dark chocolate, and 2 T cinnamon sugar over the top of the dough. Roll tightly into a log and slice ½” pieces. Place them 2" apart on parchment-lined cookie sheets. Freeze for 15 minutes. While the cookies are in the freezer, heat your oven to 375F.
Whisk the glaze ingredients. Take the cookies out of the freezer and brush them with the glaze. Bake the cookies until they start to brown on the edges and have puffed up a bit., about 20-21 minutes. Let the cookies cool.
This recipe makes about 35 cookies. These cookies may be stored at room temperature for up to 5 days or frozen for up to a month.
Looking for a nut-free Christmas cookie, or rather 3, was quite a challenge. Many of you well know that most cookies, especially around this time of year have some sort of nut component in them. But I wanted all my guests (including my nut-allergy ones) to be able to try all the cookies, so that was one of the rules that I made sure I put forth.
After poring through many cookbooks, I decided upon rugelach. Rugelach is a traditional Jewish cookie. It's got a flaky cream cheese based crust and its filling is usually some combination of cinnamon, nuts, chocolate, raisins and fruit preserves.
I made them omitting the nuts and with a chocolate, cinnamon and apricot preserve filling. I think they came out quite well and were a delicious addition to my cookie swap table.

Rugelach
(from the pages of Baking Illustrated)Dough
2 1/2 c AP flour
1 1/2 T sugar
1/4 t salt
16 T unsalted butter, cut and chilled
8 oz cc, cut and chilled
2 T sour cream
Filling
1 c sugar
1 T ground cinnamon
2/3 c apricot preserves, processed smooth
1 c dark chocolate, chopped finely
Glaze
2 lg egg yolks
2 T milk
For the Dough-
Combine the flour, sugar in the bowl of your stand mixer or food processor. A food processor works better, but either will do the job well. Add the butter, cream cheese, and sour cream and carefully combine until the dough becomes crumbly – the size of cottage cheese. Do not over-mix this dough. If you do, it will not be flaky and pastry-like once baked. Place the dough on a clean counter space divide it into 4 equal portions. Press each one into a disk and then, using wax paper to sandwich the dough, roll it out to a rectangle about 9” long x 6” wide or until the dough is about 1/8” thick. Place in the freezer for 30 min. Alternately, you can make this dough ahead of time and store it in the freezer, tightly wrapped, at this stage until you need to make the cookies. The dough can be frozen at this point for up to a month.
For the Filling-
Combine the sugar and cinnamon. Remove the dough from the freezer and spread 2 T preserves, 1/4 c chopped dark chocolate, and 2 T cinnamon sugar over the top of the dough. Roll tightly into a log and slice ½” pieces. Place them 2" apart on parchment-lined cookie sheets. Freeze for 15 minutes. While the cookies are in the freezer, heat your oven to 375F.
Whisk the glaze ingredients. Take the cookies out of the freezer and brush them with the glaze. Bake the cookies until they start to brown on the edges and have puffed up a bit., about 20-21 minutes. Let the cookies cool.
This recipe makes about 35 cookies. These cookies may be stored at room temperature for up to 5 days or frozen for up to a month.
Tuesday, December 13, 2011
Homemade Vanilla Update
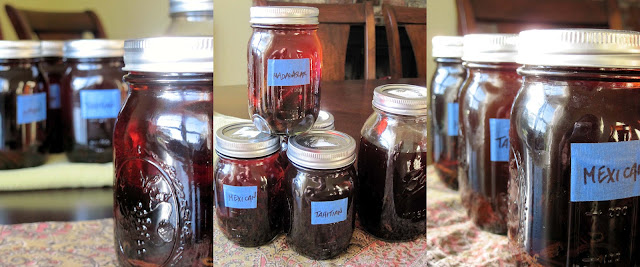
A few months ago, I posted about making homemade vanilla. I had used four different beans (Madagascar, Tahitian, Mexican, and Indian) to make four different vanilla extracts and one blend. My alcohol of choice was white rum.
Well, it's been a couple of months, just the right steeping time for those beans and I've begun to use them in my baking. The results are phenomenal. Storebought vanilla is much harsher in flavor and scent when used in baking than homemade vanilla is. My homemade vanilla is subtle, smooth, and floral and just beautifully enhances my baked goods. Of course, I haven't mentioned that homemade vanilla is much more inexpensive than storebought. This is a project that is certainly worth the time and effort, in my opinion.
At my cookie swap held this past weekend, I gave out small samples of both my Madagascar and Tahitian vanilla extracts. I hope my friends can enjoy them as much as I have been lately.


Monday, December 12, 2011
Cookie Swap 2011
This year I decided to host a cookie swap. With just a few friends, it would be an intimate affair that we all needed - a respite from the harriedness of this time of the year. Preparation for this party was the hurdle though, having set a 3 cookie requirement and eliminating the use of tree nuts in these cookies. This party was my idea of fun - sitting around the table, eating sweet treats, and discussing baking! The cookies my lovely friends brought were amazing and quite varied and so much fun to taste and evaluate. I cannot wait for next year's swap.
The cookie I made is a Cranberry White Chocolate Biscotti. It's flavored with orange zest and this combination - white chocolate, cranberries, and orange - is really amazing. If you haven't tried it already, you must. The smells wafting from my oven while baking this cookie are truly bakery-worthy. The biscotti is perfect with a hot cup of coffee, tea, hot chocolate or any other warm drink you prefer. It's utterly dunkable - becoming soft and losing their crunch while retaining their structure, the white chocolate drizzle starting to melt slightly, as it absorbs just the right amount of liquid from your hot and cozy drink... mmmmmm.. cookie heaven.


The cookie I made is a Cranberry White Chocolate Biscotti. It's flavored with orange zest and this combination - white chocolate, cranberries, and orange - is really amazing. If you haven't tried it already, you must. The smells wafting from my oven while baking this cookie are truly bakery-worthy. The biscotti is perfect with a hot cup of coffee, tea, hot chocolate or any other warm drink you prefer. It's utterly dunkable - becoming soft and losing their crunch while retaining their structure, the white chocolate drizzle starting to melt slightly, as it absorbs just the right amount of liquid from your hot and cozy drink... mmmmmm.. cookie heaven.


Thursday, December 8, 2011
Christmas Cookie Blunders
Christmas cookies have become a tradition in our house almost as important as putting up the tree and decorating it. The kids are excited to hear which cookies I've picked each year as the stars of our Christmas cookie lineup and even more so to sample them and have them easily accessible for the few weeks before this joyous holiday.
One of our favorite cookies are snowballs. They are melt-in-your-mouth little domes of sugary bliss. With ground nuts blended in, they are more commonly known as mexican wedding cakes. The powdered sugar incorporated into this dough makes them so delicate that they do indeed literally melt in your mouth. I think we all prefer the nutty versions of these cookies - as we prefer the nuttier versions of most everything (not limited to edible things)... :-) You can really use whatever nut you desire. My favorites are hazelnuts and almonds but pecans, walnuts, and pistachios would do well too.
One evening this week, my son, unaware of my excessively long list of things to do, requested homemade cookies. I couldn't turn him down because well, who in their right mind could turn down cookies? We were feeling the holiday spirit and Christmas isn't Christmas without cookies....! I asked him if he wanted snowballs and he eagerly said yes. After searching high and low for my recipe and not having any luck I decided to throw together the ingredients from memory and cross my fingers.
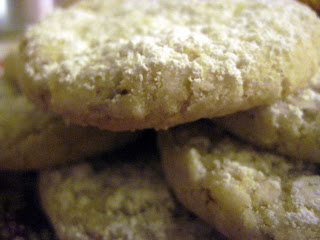
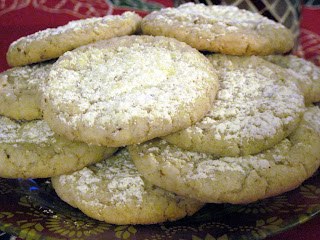 As you can plainly see from the picture above, the result was NOT a snowball nor a mexican wedding cake. The cookies spread in the oven causing them to look more like a traditional sugar cookie than anything else. Of course this is in part because I forgot to refrigerate the dough before throwing the cookies into the oven. In my defense, I was trying to make these cookies while figuring out what I was going to prepare for dinner, so I was a bit distracted. Nevertheless, the cookies spread and when I pulled them out and took a bite, I was pleasantly surprised by the result. The cookie was a crispy-on-the-outside, chewy-on-the-inside nutty sugary cookie that was quite delightful! To make sure I was not imagining it, I let the kids taste them. Though they were disappointed they didn't get the cute little powdered sugar-coated snowball shapes that they are so accustomed to at this time of year, they loved them and their samples disappeared before I could say "Time for dinner!" A happy accident! I was so pleased with this cookie that I have decided to share the recipe with all of you. In fact, I've added it to my cookie aresenal and I am excited to try it again with different nuts.

Leelabean's Nutty Snow Flurry Cookies
1/2 cup nuts, ground - pistachios, walnuts, hazelnuts, pecans, almonds (I used almonds, here)
1 cup confectioner's sugar
1 cup all-purpose flour
pinch of salt
1 stick unsalted butter, room temperature
1 tsp vanilla extract
more confectioner's sugar (for dusting)
Whisk together the ground nuts, confectioner's sugar, flour and salt in a bowl. Using an electric mixer, beat the butter and vanilla extract together until light. Slowly incorporated the flour/nut mixture until just combined. Roll into 1" balls and space evenly 2" apart on a greased cookie sheet. Bake for 12 - 15 minutes or until the edges start to lightly brown. Let the cookies rest for about 10 minutes on your counter. Dust the cookies with more confectioner's sugar and enjoy. This recipe makes 16 - 20 cookies.
One of our favorite cookies are snowballs. They are melt-in-your-mouth little domes of sugary bliss. With ground nuts blended in, they are more commonly known as mexican wedding cakes. The powdered sugar incorporated into this dough makes them so delicate that they do indeed literally melt in your mouth. I think we all prefer the nutty versions of these cookies - as we prefer the nuttier versions of most everything (not limited to edible things)... :-) You can really use whatever nut you desire. My favorites are hazelnuts and almonds but pecans, walnuts, and pistachios would do well too.
One evening this week, my son, unaware of my excessively long list of things to do, requested homemade cookies. I couldn't turn him down because well, who in their right mind could turn down cookies? We were feeling the holiday spirit and Christmas isn't Christmas without cookies....! I asked him if he wanted snowballs and he eagerly said yes. After searching high and low for my recipe and not having any luck I decided to throw together the ingredients from memory and cross my fingers.


Leelabean's Nutty Snow Flurry Cookies
1/2 cup nuts, ground - pistachios, walnuts, hazelnuts, pecans, almonds (I used almonds, here)
1 cup confectioner's sugar
1 cup all-purpose flour
pinch of salt
1 stick unsalted butter, room temperature
1 tsp vanilla extract
more confectioner's sugar (for dusting)
Whisk together the ground nuts, confectioner's sugar, flour and salt in a bowl. Using an electric mixer, beat the butter and vanilla extract together until light. Slowly incorporated the flour/nut mixture until just combined. Roll into 1" balls and space evenly 2" apart on a greased cookie sheet. Bake for 12 - 15 minutes or until the edges start to lightly brown. Let the cookies rest for about 10 minutes on your counter. Dust the cookies with more confectioner's sugar and enjoy. This recipe makes 16 - 20 cookies.
The Traveling Cookie
Last month I did something I'd never done before. I shipped my sugar cookies cross-country. My aunt had requested a bunch of Thanksgiving/Fall-inspired cookies to give to her friends for the holidays. I was excited to do the job, but wary of the potential result - cookies ending up on her doorstep in pieces...
But where there is a will, there's a way. So, I baked my cookies in three flavors - vanilla, chocolate, and gingerbread - and then wrapped them in cellophane bags. I purchased foam sheets, boxes, tissue paper, bubble wrap and peanuts. Overkill? Possibly.


I wrapped everything up in a box and must have written FRAGILE - FOOD ITEMS on the box about 20 times. I said a prayer and shipped them off. After what seemed like forever (2 1/2 days), my aunt informed me that the cookies arrived and not a single one had broken! Imagine my relief!
I had read online that sugar cookies with royal icing were sturdy for shipping, but I don't use royal icing for my cookies (my icing tastes better and is not as rock hard - it's a secret recipe). Well, seeing is believing and now I feel confident enough to ship my sugar cookies anywhere and have them arrive in one beautiful piece!
Monday, November 28, 2011
Thanksgiving
This year we had Thanksgiving at our house. It was low-key but special and completely enjoyable with the kids parttaking in the preparation of Thanksgiving dinner. It was the first year I truly felt like they were involved and sharing in the true meaning of the celebration.
We roasted a turkey and all the trimmings - sausage sage stuffing, roasted veggies, garlic mashed potatoes, sweet potato casserole, cranberry sauce, apple cider gravy and a dish of "plain jane" green beans, specifically requested by the kids. For dessert we had a Nutella cheesecake with an almond crust and pecan & walnut bars rather than the usual pies.
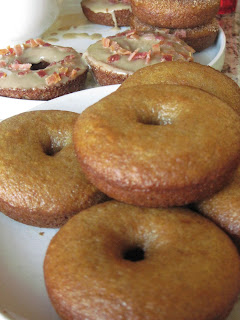
To start the day, I made a batch of apple cider donuts. I'd just purchased a donut pan and wanted to try baking donuts - something I'd never done before. They were easy to throw together for breakfast and ended up being a delicious start to the most wonderful day of the year (in my opinion), especially with a steaming hot cup of coffee or hot chocolate (topped with whipped cream, of course)! Go over to The City Sisters blog to get the recipe that I used. This version is a healthy swap-out to the usual fried donut.
I dipped some of mine in cinnamon sugar, some in a maple glaze, and others in a maple glaze with crumbled bacon on top. The sweet and salty combination was my personal favorite.

 Happy Thanksgiving...!
We roasted a turkey and all the trimmings - sausage sage stuffing, roasted veggies, garlic mashed potatoes, sweet potato casserole, cranberry sauce, apple cider gravy and a dish of "plain jane" green beans, specifically requested by the kids. For dessert we had a Nutella cheesecake with an almond crust and pecan & walnut bars rather than the usual pies.
To start the day, I made a batch of apple cider donuts. I'd just purchased a donut pan and wanted to try baking donuts - something I'd never done before. They were easy to throw together for breakfast and ended up being a delicious start to the most wonderful day of the year (in my opinion), especially with a steaming hot cup of coffee or hot chocolate (topped with whipped cream, of course)! Go over to The City Sisters blog to get the recipe that I used. This version is a healthy swap-out to the usual fried donut.
I dipped some of mine in cinnamon sugar, some in a maple glaze, and others in a maple glaze with crumbled bacon on top. The sweet and salty combination was my personal favorite.


Thursday, November 17, 2011
More Fall Baking
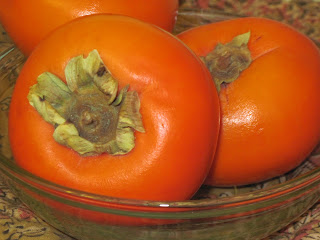
A couple of weeks ago, I got a bunch of persimmons from my friend. Her aunts grow them out in California and they had both shipped her some so she had some extra persimmons that she so generously gave to me. Of course, the first thing that came to my mind was how to bake with them. I've heard that persimmons are just like any other fruit when it comes to baking. You can make delicious breads and muffins with them. Their flavor is mild but pairs very well with the same spices you would use with pumpkins - cinnamon, nutmeg, gloves, ginger. One thing when baking with persimmons is that the fruit needs to be overripe, mushy even, to get the sweetest, most pleasing taste in your baking.
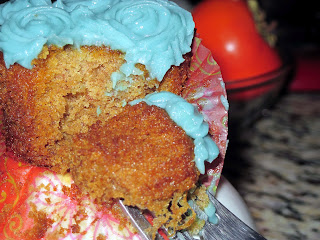
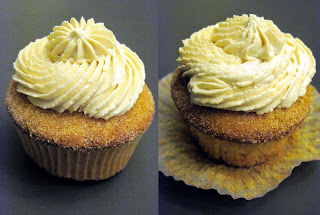
So, I baked a batch of persimmon cupcakes. I had some leftover maple buttercream from my son's birthday party that I thought would be the perfect topping to this fall treat. And it was. The result was a pleasant, fall-inspired dessert with tropical undertones. If you love persimmons, you will enjoy this cupcake. It's the perfect way to get your kids to try new fruit. These cupcakes needn't be covered in frosting - they are just perfect by themselves with a cup of coffee in the morning.

1 3/4 cups All Purpose flour
1 1/4 t pumpkin pie spice
1/2 t salt
1 t baking soda
1 T canola oil
8 T unsalted butter, room temperature
1/2 c packed light brown sugar
1/2 c granulated white sugar
2 large eggs, room temperature
1 cup persimmon pulp (about 3 persimmons)
1/4 cup buttermilk
1/4 cup mango juice
Preheat your oven to 350F. Whisk all your dry ingredients together (flour, spices, salt, baking soda). In the bowl of a stand mixer, beat the butter, sugars, and oil for a couple of minutes until light and fluffy. Add in the eggs one at a time, followed by the persimmon pulp, buttermilk and mango juice. Slowly add your dry ingredients and mix only until combined. Place liners in a cupcake pan and fill them with the batter 2/3 of the way up the liners.
Bake the muffins for 25 to 30 minutes until golden brown on the top and a toothpick inserted in the middle of a muffin comes out clean. Cool on a rack and then enjoy!

So, I baked a batch of persimmon cupcakes. I had some leftover maple buttercream from my son's birthday party that I thought would be the perfect topping to this fall treat. And it was. The result was a pleasant, fall-inspired dessert with tropical undertones. If you love persimmons, you will enjoy this cupcake. It's the perfect way to get your kids to try new fruit. These cupcakes needn't be covered in frosting - they are just perfect by themselves with a cup of coffee in the morning.


Persimmon Muffins
1 3/4 cups All Purpose flour
1 1/4 t pumpkin pie spice
1/2 t salt
1 t baking soda
1 T canola oil
8 T unsalted butter, room temperature
1/2 c packed light brown sugar
1/2 c granulated white sugar
2 large eggs, room temperature
1 cup persimmon pulp (about 3 persimmons)
1/4 cup buttermilk
1/4 cup mango juice
Preheat your oven to 350F. Whisk all your dry ingredients together (flour, spices, salt, baking soda). In the bowl of a stand mixer, beat the butter, sugars, and oil for a couple of minutes until light and fluffy. Add in the eggs one at a time, followed by the persimmon pulp, buttermilk and mango juice. Slowly add your dry ingredients and mix only until combined. Place liners in a cupcake pan and fill them with the batter 2/3 of the way up the liners.
Bake the muffins for 25 to 30 minutes until golden brown on the top and a toothpick inserted in the middle of a muffin comes out clean. Cool on a rack and then enjoy!
Tuesday, November 8, 2011
Conquering Fears!
Last week was my son's 4th birthday party. If you know my son, you'll know that he's obsessively into sharks. He has about 500 shark toys, is constantly drawing sharks, and his favorite things to watch on TV are episodes from the famous "Shark Week." His favorites types of sharks are the great white and the megaladon. For those of you who are not aware, a megaladon is the largest prehistoric shark.
Naturally, when I started planning this party, I knew that sharks would have to be the theme.
Now, if you know me, you'll know that I have quite an intense phobia of sharks. I can usually handle seeing sharks with their mouths closed but when they're grinning and baring all I scream and hide. It's pretty pathetic, I know, but it's always been this way. Face your fears gets taken to a whole other level when you end up with a son who takes out 10 shark books from the library at a time, each one containing grizzlier pictures than the previous one. I have to constantly be on guard throughout my house for fear of finding one of these books or toys staring me in the face.
This posed a bit of a problem when I was sketching out the birthday cake. I wanted a giant shark coming out of the water head first with his mouth wide open. How was I going to do this? Surely I'd need a point of reference.. I ended up using a foot-and-a-half long rubber shark toy that I've grown, after quite a few months of mental training, used to looking at. Its features are just a tad off, so it's menace factor is not as bad as it could be. For specifics such as eye location and positioning of the teeth, I asked my husband to refer to pictures of real sharks and report back to me. I must say it worked out. We're a good team. :-)

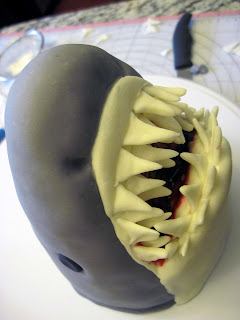
An exciting bit about this cake was that it was the first cake where I've attempted to use rice crispie treats to mold the decorative part. The shark was entirely molded from these treats, frosted in buttercream and then thickly layered with homemade fondant. Working with these treats proved to be a fun experience and one I will definitely tackle again!


My son's party was a blast. It was my favorite kind of party - an intimate affair - with family and close family friends. There were shark games, shark bites, and we even gave away shark bait as prizes! After having spent hours designing and creating my son's birthday cake, something happened to me that never has before. I became quite attached to my shark creation atop the cake. I couldn't bear to let the kids take it apart to sample, much to their disappointment. After the party, I carefully wrapped it up and put it away in my fridge where it safely sits, still today. I've no plans of getting rid of it anytime soon... Every day, I peek in and stare lovingly at my fearless creation. :-)


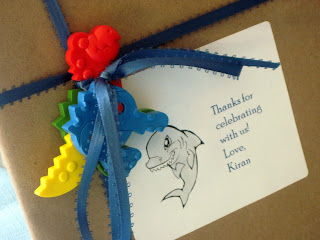
Happy Birthday, Honey Pie!
Naturally, when I started planning this party, I knew that sharks would have to be the theme.
Now, if you know me, you'll know that I have quite an intense phobia of sharks. I can usually handle seeing sharks with their mouths closed but when they're grinning and baring all I scream and hide. It's pretty pathetic, I know, but it's always been this way. Face your fears gets taken to a whole other level when you end up with a son who takes out 10 shark books from the library at a time, each one containing grizzlier pictures than the previous one. I have to constantly be on guard throughout my house for fear of finding one of these books or toys staring me in the face.
This posed a bit of a problem when I was sketching out the birthday cake. I wanted a giant shark coming out of the water head first with his mouth wide open. How was I going to do this? Surely I'd need a point of reference.. I ended up using a foot-and-a-half long rubber shark toy that I've grown, after quite a few months of mental training, used to looking at. Its features are just a tad off, so it's menace factor is not as bad as it could be. For specifics such as eye location and positioning of the teeth, I asked my husband to refer to pictures of real sharks and report back to me. I must say it worked out. We're a good team. :-)


An exciting bit about this cake was that it was the first cake where I've attempted to use rice crispie treats to mold the decorative part. The shark was entirely molded from these treats, frosted in buttercream and then thickly layered with homemade fondant. Working with these treats proved to be a fun experience and one I will definitely tackle again!


My son's party was a blast. It was my favorite kind of party - an intimate affair - with family and close family friends. There were shark games, shark bites, and we even gave away shark bait as prizes! After having spent hours designing and creating my son's birthday cake, something happened to me that never has before. I became quite attached to my shark creation atop the cake. I couldn't bear to let the kids take it apart to sample, much to their disappointment. After the party, I carefully wrapped it up and put it away in my fridge where it safely sits, still today. I've no plans of getting rid of it anytime soon... Every day, I peek in and stare lovingly at my fearless creation. :-)


Happy Birthday, Honey Pie!
Wednesday, November 2, 2011
Birthday Cinnamon Rolls
Birthdays are probably the single most exciting day in a child's life each year. I am a huge believer in setting traditions for my family. It allows us to recall precious memories of those special days in our lives and gives home a sense of comfort and reliability in an otherwise chaotic, unsure world.
This week was my son's 4th birthday! Over the past couple of years, I've been making cinnamon rolls (one of my kids' favorites) on birthday mornings for breakfast. It's become a nice tradition, though I wasn't able to find the perfect recipe. The recipe below, however, is a keeper. The rolls are big and fluffy and not overly sweet. The tart cream cheese icing is the ideal compliment.

Now my kids know to expect birthday cinnamon rolls on that one very special day every year. For a family of four, four days of cinnamon rolls per year is perfect, because, well... let's just say they're not the most healthy breakfast option. :-)
 If you are using yeast for the first time, don't be afraid. There are two key rules to follow: 1. Make sure the liquid you are adding your yeast to is between 110F and 120F. Don't guess! Use a thermometer. 2. Make sure the date on your yeast has not expired. Yeast is finicky and you need fresh yeast to produce a rise. Follow the recipe below as written and you will have delicious homemade cinnamon rolls that you can thank me for later... :-)
Cinnamon Rolls
(Slightly adapted from: Tracey's Culinary Adventures which was adapted from the TV show, Cooks Country)
Dough:
3/4 cup milk (110F - 120F)
2 1/4 t instant yeast
3 large eggs, RT
4 1/4 cups all-purpose flour
1/2 cup cornstarch
1/2 cup sugar
1 1/2 t salt
12 T unsalted butter, RT & cut into small chunks
Cinnamon Filling:
1 1/2 cups packed light brown sugar
1 1/2 T cinnamon
1/4 t salt
4 T unsalted butter, RT
Cream Cheese Frosting:
4 oz cream cheese, RT
1 T milk
1 t vanilla extract
1 1/2 cups confectioners' sugar (10x)
Heat your oven to 200F and then turn it off. Line a 13x9" pan with foil and spray it with cooking spray.
Add the yeast to the warm milk and whisk. The yeast will start to foam. Add the eggs and blend together. In the bowl of a stand mixer fitted with the dough hook, add the flour, cornstarch, sugar, and salt. While the mixer is on low, drizzle the milk-yeast-egg mixture in until the dough begins to come together. Add the chunks of butter one at a time as you increase the speed of the mixer to medium. Knead this dough for about 10 minutes. A sign that the dough is well kneaded is when the dough looks smooth and doesn't stick to the side of the bowl. Once this happens, take out the dough and shape it into a ball. Place the ball of dough into a large bowl (at least 3x the size of the dough) that has been greased. Cover the bowl with plastic wrap and let it sit in the warm oven (that was preheated to 200F and then turned off) for about 2 hours. The dough will have risen to 2x it's original size.
While the dough is rising, you can make your filling. Combine the light brown sugar, cinnamon, and salt together. Add the softened butter and mix to get a homogeneous paste. Set aside until you are ready to use it.
Once the dough is risen, turn it out onto a well-floured surface. Roll the dough into an 18" square. Spread the butter and cinnamon mixture evenly all over the dough leaving about 1/2" border around the edges. Roll the dough towards you in a very tight log. Pinch the seam of the log to make a seal. Cut the roll in 1/2, then 1/2 again and repeat until you have 12 equal pieces. Put each individual piece swirl-side up in the prepared baking pan. Cover this pan with plastic wrap and leave it on your stove to proof for another hour. The rolls will have doubled in size again.
Preheat your oven to 350F. Take the plastic wrap off and bake the rolls for about 35-40 minutes or until the tops are golden brown. While the rolls are in the oven, make the cream cheese frosting. Whisk all the frosting ingredients in a bowl and set aside.
Take the rolls out of the oven. At this point, you may cool them and freeze them if you want to have them at a later time. If not, spread a thin layer of frosting on them and let them cool for about half an hour. Then top with the remaining frosting, serve and enjoy! You may individually wrap and freeze the cinnamon rolls as well, after baking and icing them. They keep for up to 3 months.
This week was my son's 4th birthday! Over the past couple of years, I've been making cinnamon rolls (one of my kids' favorites) on birthday mornings for breakfast. It's become a nice tradition, though I wasn't able to find the perfect recipe. The recipe below, however, is a keeper. The rolls are big and fluffy and not overly sweet. The tart cream cheese icing is the ideal compliment.

Now my kids know to expect birthday cinnamon rolls on that one very special day every year. For a family of four, four days of cinnamon rolls per year is perfect, because, well... let's just say they're not the most healthy breakfast option. :-)

Cinnamon Rolls
(Slightly adapted from: Tracey's Culinary Adventures which was adapted from the TV show, Cooks Country)
Dough:
3/4 cup milk (110F - 120F)
2 1/4 t instant yeast
3 large eggs, RT
4 1/4 cups all-purpose flour
1/2 cup cornstarch
1/2 cup sugar
1 1/2 t salt
12 T unsalted butter, RT & cut into small chunks
Cinnamon Filling:
1 1/2 cups packed light brown sugar
1 1/2 T cinnamon
1/4 t salt
4 T unsalted butter, RT
Cream Cheese Frosting:
4 oz cream cheese, RT
1 T milk
1 t vanilla extract
1 1/2 cups confectioners' sugar (10x)
Heat your oven to 200F and then turn it off. Line a 13x9" pan with foil and spray it with cooking spray.
Add the yeast to the warm milk and whisk. The yeast will start to foam. Add the eggs and blend together. In the bowl of a stand mixer fitted with the dough hook, add the flour, cornstarch, sugar, and salt. While the mixer is on low, drizzle the milk-yeast-egg mixture in until the dough begins to come together. Add the chunks of butter one at a time as you increase the speed of the mixer to medium. Knead this dough for about 10 minutes. A sign that the dough is well kneaded is when the dough looks smooth and doesn't stick to the side of the bowl. Once this happens, take out the dough and shape it into a ball. Place the ball of dough into a large bowl (at least 3x the size of the dough) that has been greased. Cover the bowl with plastic wrap and let it sit in the warm oven (that was preheated to 200F and then turned off) for about 2 hours. The dough will have risen to 2x it's original size.
While the dough is rising, you can make your filling. Combine the light brown sugar, cinnamon, and salt together. Add the softened butter and mix to get a homogeneous paste. Set aside until you are ready to use it.
Once the dough is risen, turn it out onto a well-floured surface. Roll the dough into an 18" square. Spread the butter and cinnamon mixture evenly all over the dough leaving about 1/2" border around the edges. Roll the dough towards you in a very tight log. Pinch the seam of the log to make a seal. Cut the roll in 1/2, then 1/2 again and repeat until you have 12 equal pieces. Put each individual piece swirl-side up in the prepared baking pan. Cover this pan with plastic wrap and leave it on your stove to proof for another hour. The rolls will have doubled in size again.
Preheat your oven to 350F. Take the plastic wrap off and bake the rolls for about 35-40 minutes or until the tops are golden brown. While the rolls are in the oven, make the cream cheese frosting. Whisk all the frosting ingredients in a bowl and set aside.
Take the rolls out of the oven. At this point, you may cool them and freeze them if you want to have them at a later time. If not, spread a thin layer of frosting on them and let them cool for about half an hour. Then top with the remaining frosting, serve and enjoy! You may individually wrap and freeze the cinnamon rolls as well, after baking and icing them. They keep for up to 3 months.
Starbucks at Home
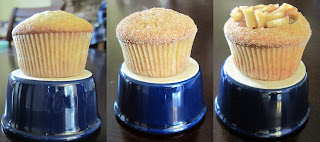
I wish I had a Starbucks bar complete with barista built into my home, at my beck and call 24-7. This is not an uncommon statement to profess, especially in the Fall when the seasonal drinks start resurfacing on their menu. Pumpkin spice lattes, salted caramel mochas (please do try one of these.. it's worth the hefty price tag, once in a while), gingerbread mochas, and peppermint hot chocolates have become some of my favorites over the years. Nothing goes better with these drinks, in my opinion, than one of their yummy pumpkin scones.
Perusing some of my favorite food and baking blogs, I came across a recipe for pumpkin scones that seemed to mimic the Starbucks ones right down to the double icing. It's easy to put together (I did so in about 10 minutes) and quick to bake (another 12 minutes or so), so a perfect fall morning treat with a nice steamy mug of coffee. For the price of one Starbucks pumpkin scone, you can make a whole batch.
These were delish. Give them a try.

Scones:
2 cups all-purpose flour
1/4 cup + 3T granulated sugar
1 T baking powder
1/2 t salt
1 1/2 t pumpkin pie spice
6 T cold unsalted butter, cut into small cubes
3/4 cup canned pumpkin puree
3 T heavy cream or half and half
1 large egg
Simple Icing:
1 cup powdered sugar
2 T milk
Spiced Icing:
1/2 cup powdered sugar
2 T milk
1/4 t pumpkin pie spice
Preheat your oven to 425F. Line a baking tray with parchment paper or a nonstick reusable liner such as a Silpat. In a bowl, combine the flour, sugar, baking powder, salt and pumpkin pie spice. Add the butter and use a pastry cutter or your fingers to break the butter into smaller pieces and incorporate it into the dry mixture until it resembles a coarse cornmeal consistency. You want small lumps of butter running throughout.
In a separate bowl, whisk together the pumpkin puree, heavy cream and egg. Gently fold the wet ingredients into the dry ingredients until you have made a roughly-shaped ball. On a floured surface, turn out the ball and pat it to make a 4"x12" rectangle. Cut the rectangle into thirds and then cut an X into each third, leaving you with 12 triangular scones. Place them on the lined baking tray and bake for about 12 - 15 minutes. You want a light browning on these scones. Be sure not to overbake as they will dry out. When the scones come out of the oven, let them cool for about 20 minutes before adding the icing.
Make the icing: To make the simple icing, whisk the ingredients together in a small bowl. For the spiced icing, do the same in a separate bowl.
Once the scones are cooled, dip them into the simple icing or use a pastry brush to brush the icing on. Let the icing harded for a few minutes. Then take a fork, dip it into the spiced icing, and lightly drizzle it over your scones. Let the icing set for a few minutes and voila - pumpkin scones a la Starbucks, only better. Oh, and these are completely freezable, iced and all! Just microwave them for 15 seconds at a time at 70% until warm. Enjoy!
Perusing some of my favorite food and baking blogs, I came across a recipe for pumpkin scones that seemed to mimic the Starbucks ones right down to the double icing. It's easy to put together (I did so in about 10 minutes) and quick to bake (another 12 minutes or so), so a perfect fall morning treat with a nice steamy mug of coffee. For the price of one Starbucks pumpkin scone, you can make a whole batch.
These were delish. Give them a try.

Pumpkin Scones
(adapted from Sweet Pea's Kitchen)Scones:
2 cups all-purpose flour
1/4 cup + 3T granulated sugar
1 T baking powder
1/2 t salt
1 1/2 t pumpkin pie spice
6 T cold unsalted butter, cut into small cubes
3/4 cup canned pumpkin puree
3 T heavy cream or half and half
1 large egg
Simple Icing:
1 cup powdered sugar
2 T milk
Spiced Icing:
1/2 cup powdered sugar
2 T milk
1/4 t pumpkin pie spice
Preheat your oven to 425F. Line a baking tray with parchment paper or a nonstick reusable liner such as a Silpat. In a bowl, combine the flour, sugar, baking powder, salt and pumpkin pie spice. Add the butter and use a pastry cutter or your fingers to break the butter into smaller pieces and incorporate it into the dry mixture until it resembles a coarse cornmeal consistency. You want small lumps of butter running throughout.
In a separate bowl, whisk together the pumpkin puree, heavy cream and egg. Gently fold the wet ingredients into the dry ingredients until you have made a roughly-shaped ball. On a floured surface, turn out the ball and pat it to make a 4"x12" rectangle. Cut the rectangle into thirds and then cut an X into each third, leaving you with 12 triangular scones. Place them on the lined baking tray and bake for about 12 - 15 minutes. You want a light browning on these scones. Be sure not to overbake as they will dry out. When the scones come out of the oven, let them cool for about 20 minutes before adding the icing.
Make the icing: To make the simple icing, whisk the ingredients together in a small bowl. For the spiced icing, do the same in a separate bowl.
Once the scones are cooled, dip them into the simple icing or use a pastry brush to brush the icing on. Let the icing harded for a few minutes. Then take a fork, dip it into the spiced icing, and lightly drizzle it over your scones. Let the icing set for a few minutes and voila - pumpkin scones a la Starbucks, only better. Oh, and these are completely freezable, iced and all! Just microwave them for 15 seconds at a time at 70% until warm. Enjoy!
Saturday, October 22, 2011
The Chocolate Before the Storm
Chocolate is one of those things, for me anyway, that beckons me on a daily- make that hourly basis. Dark, milk, studded with nuts, draped over fruit, and of course, out of a jar (Nutella, of course!), it is forever in the forefront of my thoughts. And since I bake way more than the average person and have goals of one day owning my own bakery, I cannot just rid my pantry, fridge and freezer (yes, I have chocolate in all three of those places) of this creamy confection.
My solution is to keep busy, which is not hard considering the aformentioned goal and having two little cupcakes to run after. So, tirelessly (and sometimes not), this is what I do. Day in, day out, I keep busy to keep myself away from chocolate. There is the rare occasion, however when life tends to slow down. Oddly, it's usually right before an incredibly busy and stressful period. I wonder if I do that subconsciously - give myself a sort of break - a calm before the storm. Case in point: this weekend starts the frenzied planning, baking, cooking, preparing, and decorating for a whole slew of parties. Two school-aged kids means two school Halloween parties, one of them a birthday celebration as well for my sweet son, who turns 4 next week. Taking on a shared role of class mom for my daughter's class means co-piloting their school party on Halloween Day. In between these two parties will be my son's actual birthday, which of course needs to be celebrated with some form of planned hooplah! The following day comes his 4th birthday party, kept small this year with a relatively limited guest list, for the sake of sanity. So four events within five days. Utter mayhem. That's next week. Stay tuned...
So, back to chocolate - a few months ago, I made a cake for a friend of mine who'd just given birth to an adorable little baby girl. This friend is a chef, trained in culinary school so I knew this cake would have to rock. No pressure, right? I decided to go for a simple combination, one that works most always - chocolate on chocolate. End result: she still talks about that very cake, which to me means I did it right.
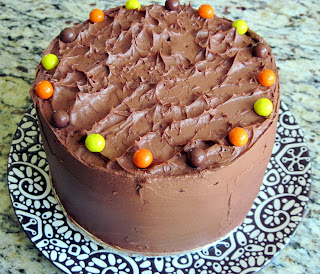 It is a chocolate cake filled and frosted with a chocolate ganache buttercream - both my own recipes. The end result is a decadent (a word that my hubbie and I decided can only justly be used to define chocolate), lucious chocolate dream. I made a smallish version of it this week. It was two layers and 6" in diameter - the perfect size for my cupcakes and me. It was the second time, however, that my husband was not present to have a piece. Hopefully next time, Honey.
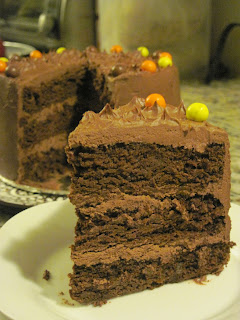 I find it to be the perfect pre-crazed week indulgence. Halloween and birthday parties next week? Bring it on!!
My solution is to keep busy, which is not hard considering the aformentioned goal and having two little cupcakes to run after. So, tirelessly (and sometimes not), this is what I do. Day in, day out, I keep busy to keep myself away from chocolate. There is the rare occasion, however when life tends to slow down. Oddly, it's usually right before an incredibly busy and stressful period. I wonder if I do that subconsciously - give myself a sort of break - a calm before the storm. Case in point: this weekend starts the frenzied planning, baking, cooking, preparing, and decorating for a whole slew of parties. Two school-aged kids means two school Halloween parties, one of them a birthday celebration as well for my sweet son, who turns 4 next week. Taking on a shared role of class mom for my daughter's class means co-piloting their school party on Halloween Day. In between these two parties will be my son's actual birthday, which of course needs to be celebrated with some form of planned hooplah! The following day comes his 4th birthday party, kept small this year with a relatively limited guest list, for the sake of sanity. So four events within five days. Utter mayhem. That's next week. Stay tuned...
So, back to chocolate - a few months ago, I made a cake for a friend of mine who'd just given birth to an adorable little baby girl. This friend is a chef, trained in culinary school so I knew this cake would have to rock. No pressure, right? I decided to go for a simple combination, one that works most always - chocolate on chocolate. End result: she still talks about that very cake, which to me means I did it right.


Friday, October 14, 2011
Ooh la la, Eclairs!
I have a friend that shares my love of baking so much so that when we get together (which is not too often), we would rather don our aprons and create some fantastic dessert than go out on the town. That's actually not quite true... Wearing my apron is actually a practice I wish I followed. Usually, at the end of a day of baking I am covered head to toe in flour, eggs, and the like. Somehow my friend, a non-apron wearer as well, never manages to get messy.... Go figure. To make matters worse, I wear a lot of black....
This week we were lucky enough to get some time to bake, so we opted to make eclairs. Eclairs are a french pastry made of pate a choux (literally translated to "cabbage pastry" as the pastry resembles cabbage when baked) which is a dough that is cooked over the stove in a quite finicky manner. This dough is piped out and baked at two different temperatures, the first to achieve the puff and the latter to brown the pastry. Once cooled they are injected with a beautiful vanilla custard and then dipped in chocolate ganache. Profiteroles, or cream puffs, can be made with the same pastry, cream, and chocolate, the only difference being the shape. For these adorable little puffs, pipe out little blobs rather than logs of pate a choux. Contrary to what you are probably thinking, making eclairs is not difficult as one might imagine. As long as the steps are followed exactly, it's a fun experience! These eclairs are best fresh. But if you bake too many (and with eclairs, any more than 2 is too many), you may want to freeze them. After baking this batch, I froze a few and voila! Stick one in the microwave for a few seconds and I can have an eclair any time I want.... Not really the best thing, actually. If you plan on freezing them, make sure you do so completely assembled (filled with custard and dipped in chocolate).
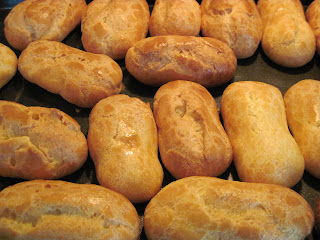

I have another friend who absolutely dies for these beauties. I don't know if he just loves eclairs in general or specifically the ones I make, but he's been raving about them for years now. :) I have been using this recipe for all those years. Check it out, make yourself some, and save one for me.
Wednesday, October 5, 2011
Sweet Potato Waffles
This week at the grocery store, I had it in my head to grab some sweet potatoes. Sweet potatoes are great, healthy vegetables year round, but in the fall they are especially fitting. Upon returning home and putting my groceries away, I realized I already had sweet potatoes waiting to be cooked.. oh well, good thing sweet potatoes are a versatile ingredient that can be used in baking too! Happy accident. The idea of a sweet potato cake was a little too similar to the cakes I've been producing the past few weeks and I wanted something different. Sweet potato waffles were the perfect solution! The kids will think they are eating a sweet and delectable dessert-y breakfast when in fact, they'll be ingesting lots of healthy goodness like vitamin A, dietary fiber (an average sized sweet potato contains about 3 g), and antioxidants such as beta-carotene. Sweet potatoes are also anti-inflammatories and surprisingly, help regulate blood sugar levels.
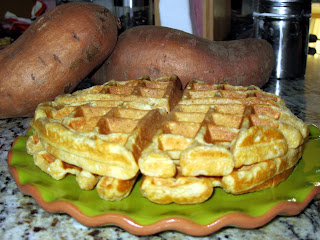
Have them hot and crispy with sliced bananas and powdered sugar or drizzled with maple syrup and pecans... They're delightful!
Sweet Potato Waffles
2 cups all-purpose flour
1 T baking soda
1/2 t salt
2 eggs, large
3 T melted butter, cooled
2 T oil
1 t vanilla extract
1 cup buttermilk
3/4 cup milk
1 baked sweet potato
1/4 cup packed light brown sugar
1 t pumpkin pie spice
Mash the baked sweet potato together with the light brown sugar and pumpkin pie spice and set aside. Combine the flour, baking powder and salt. In a separate bowl, blend the buttermilk, milk, eggs, oil, vanilla, and cooled butter. Combine the wet ingredients with the sweet potato mixture and then add the dry ingredients. Heat up your waffle iron, make the waffles, and enjoy!
Homemade is better than Storebought...
Always.. isn't it? Homemade cake.. homemade cookies... homemade burgers... homemade pancakes... As long as you've got a good basic recipe and a little creativity, you can make customized, delicious, better-than-storebought food.
One very unusual day, I found myself running out of vanilla extract, an otherwise absolute staple in my pantry! Usually when I am half-way through a bottle, I make sure to grab another one on my next trip to the grocery store just to make sure I never run out... I don't know what happened this time. I guess everything happens for a reason because it led to this experiment which I am so excited about! I decided to finally try my hand at making vanilla extract at home!
Expensive as it can be, vanilla extract, aside from flour, butter, and sugar, is an indispensible ingredient in baking. It's mellow, floral notes enhance the other flavors of your baked goods. It's kind of like what salt does when you add it to foods. It enhances the flavor of just about anything baked. The bonus - it's incredibly easy to make yourself.

All you need is some alcohol like vodka or light rum and some vanilla beans. There are all different kinds and grades of vanilla beans out there. Vanilla beans come from Madagascar, Tahiti, and Mexico to name a few. Each, with its own distinct taste can be used in various types of desserts. When buying vanilla beans, the grade is very important. Grade A is the purest quality and Grade C is the least. Grades are predominantly dependent upon the length of the bean. When using vanilla beans, try to get Grade A beans for optimal flavor.
I purchased an assortment of vanilla beans from beanilla.com. The service was great and the beans arrived within a few days. They had so many different types of beans too, which was great for my experiment.
I used a 3:1 ratio of beans to cups of alcohol - three beans to one cup of alcohol. Make sure you slice the vanilla bean lengthwise before adding it to the alcohol to release the beans into the extract. I used an airtight container to seal the extract and I periodically shake the bottle to redistribute the vanilla beans. The extract changed color within a couple of days to a beautiful bourbon shade. Just remember the longer you keep it "brewing," the deeper, more complex flavor your extract will have. I plan to keep mine brewing for around two months. After this, strain the liquid and voila! You now have vanilla extract. Homemade, cheaper, and no doubt yummier than the store brands. In two months or so, I'll be blogging the results of this exciting experiment.. Stay tuned...!

Sunday, September 25, 2011
Apple Pie Cupcakes
Last week I mentioned that my two favorite flavors of fall are pumpkin and apple. Well, after opening one of those giant 32oz cans of pumpkin and making use of all the delicious goodness inside, I'm ready to move on to the wonderful world of apples! (This doesn't mean I'm done with pumpkins, by any stretch!)
I wanted to bring a bunch of cupcakes to a dear friend of mine who did a huge favor for me this week. She has two young kids, so an apple cupcake is a healthier, more acceptable flavor for them, which works well for me. After spending some time thinking about what flavors could meld well with apples and drawing inspiration from this idea, I decided I definitely wanted the flavors of this cupcake to echo those of a warm, buttery apple pie. I didn't just want apple pie filling in a vanilla cupcake, though. I wanted you to feel like you were eating apple pie in cupcake form - crispy, flaky crust and all.
My base was to be a brown butter cupcake. If you haven't already, you really need to brown butter in your kitchen. The nutty, buttery aroma fills your house. It's butter, only taken up 10 notches... The brown butter cupcake is like a toasted vanilla cupcake, which, in this case, reflected the crust of an apple pie. For the filling, I made a traditional apple pie filling and cut out a substantial chunk of the cupcake to fill it up. What did I do with the cut-outs, you are wondering? Dunno.. They seemed to disappear as I was cutting them.. :-)
After having discovered Biscoff spread a few weeks ago, I knew I wanted to incorporate this flavor into these cupcakes. So I made a Biscoff buttercream to top off my apple pie cupcakes with. Biscoff, in case you are not aware, is a European cookie. It's cinnamon-y and caramel-y and crunchy and satisfying. If you've ever flown Delta, you'll know that it's the in-flight cookie of choice. Biscoff spread is a molten, spreadable cookie-in-a-jar. Think Nutella, only different... in a good way. You have to try it. You can find it near the peanut butter and other spreadable goodies in your local grocery store. Try it, and let me know what you think.
My cupcake taster this time around was my hubbie. I had cut one of the finished cupcakes in half to photograph for this post earlier in the day so there were two halves sitting on the plate waiting for him. My hubbie said he would probably only have one half. He's not too big on sweets, especially apple pie. He'd rather have a beer than dessert... the thought is incomprehensible, especially as my husband! But to his credit, he always makes sure he tastes my creations and gives me his 100% honest critique on them. *LOVE* Ok, enough about him. I turned away from him for a minute and when I turned back, the plate was empty. He gave me a grin and said "that was the best cupcake you've ever made." He is not one to give compliments easily. He tells it like it is. *LOVE x 2*

Apple Pie Cupcakes with Biscoff Buttercream
Brown Butter Cupcakes:
Apple Pie Filling:
Preheat your oven to 350F. Combine flour, baking powder, and baking soda in a bowl. Cream the eggs and sugar in a mixer until thick and pale. On low, add the butter, salt, and vanilla until combined. Then add the milk. Once incorporated, add the dry ingredients until just combined.
I wanted to bring a bunch of cupcakes to a dear friend of mine who did a huge favor for me this week. She has two young kids, so an apple cupcake is a healthier, more acceptable flavor for them, which works well for me. After spending some time thinking about what flavors could meld well with apples and drawing inspiration from this idea, I decided I definitely wanted the flavors of this cupcake to echo those of a warm, buttery apple pie. I didn't just want apple pie filling in a vanilla cupcake, though. I wanted you to feel like you were eating apple pie in cupcake form - crispy, flaky crust and all.
My base was to be a brown butter cupcake. If you haven't already, you really need to brown butter in your kitchen. The nutty, buttery aroma fills your house. It's butter, only taken up 10 notches... The brown butter cupcake is like a toasted vanilla cupcake, which, in this case, reflected the crust of an apple pie. For the filling, I made a traditional apple pie filling and cut out a substantial chunk of the cupcake to fill it up. What did I do with the cut-outs, you are wondering? Dunno.. They seemed to disappear as I was cutting them.. :-)

After having discovered Biscoff spread a few weeks ago, I knew I wanted to incorporate this flavor into these cupcakes. So I made a Biscoff buttercream to top off my apple pie cupcakes with. Biscoff, in case you are not aware, is a European cookie. It's cinnamon-y and caramel-y and crunchy and satisfying. If you've ever flown Delta, you'll know that it's the in-flight cookie of choice. Biscoff spread is a molten, spreadable cookie-in-a-jar. Think Nutella, only different... in a good way. You have to try it. You can find it near the peanut butter and other spreadable goodies in your local grocery store. Try it, and let me know what you think.

My cupcake taster this time around was my hubbie. I had cut one of the finished cupcakes in half to photograph for this post earlier in the day so there were two halves sitting on the plate waiting for him. My hubbie said he would probably only have one half. He's not too big on sweets, especially apple pie. He'd rather have a beer than dessert... the thought is incomprehensible, especially as my husband! But to his credit, he always makes sure he tastes my creations and gives me his 100% honest critique on them. *LOVE* Ok, enough about him. I turned away from him for a minute and when I turned back, the plate was empty. He gave me a grin and said "that was the best cupcake you've ever made." He is not one to give compliments easily. He tells it like it is. *LOVE x 2*

Apple Pie Cupcakes with Biscoff Buttercream
1 1/2 cups AP flour
1/2 t baking soda
1/2 t baking powder
1/4 t salt
1 large egg
1 large egg yolk
1 cup sugar
3/4 cup (1 1/2 sticks) unsalted butter (heated to brown butter point)
1 1/2 t vanilla
1/2 cup milk
2 T and 1/2 T butter, unsalted and separate
1 T flour
3 apples (any kind), small dice
1/4 cup brown sugar
1/4 cup white sugar
2 t Apple pie spice
Biscoff Buttercream:
1 cup (2 sticks) butter, unsalted
3-4 cups confectioners sugar
4 T Biscoff spread
1/4 cup milk, cream, or half and half
pinch of salt
1 t vanilla extract
Bake in lined cupcake wrappers for 20 - 22 minutes or until a toothpick inserted comes out crumb-free. While the cupcakes are baking, make the apple pie filling. In a saute pan on medium heat, melt the 2 T of butter. Once the butter is melted, add in the diced apple and sugars and cook for about 5 minutes or until the apples begin to soften. Then sprinkle the apple pie spice on the mixture as well as the flour. Toss and cooke for another 5 minutes. Turn off the stove and add the remaining 1/2 T of butter. Combine well. Set aside to cool completely.
To make the buttercream: Beat the butter for a few minutes until light and airy. Add the salt and vanilla and then the powdered sugar a cup at a time, reducing to 1/2 cup at a time to determine the consistency you desire. Blend in the Biscoff buttercream until well incorporated. At this point you can adjust the consistency of your buttercream with the milk/cream/half and half.
To assemble the cupcakes: Take a cupcake and gently cut out the center with a knife in the shape of a cone. You can take out as much or as little as you'd like based on how much filling you want in your cupcakes. Then add about a tablespoon (more or less depending on the size of the hole) of apple pie filling to the cupcake. Frost as desired.
Saturday, September 17, 2011
Pumpkin love...
(Amended: *Recipe included, below*)
Two things come to mind when I come upon fall - apples and pumpkins... Aside from how beautiful each is in their own right, I absolutely LOVE baking with them, as you probably figured by now. Apple and pumpkin pies, breads, cakes... Mmmmm, just the thought. Well, I've eagerly started fall baking for this year and am bringing to you, this week, an absolutely heartwarming pumpkin cupcake. It's warm and cozy especially with a warm beverage - a hot latte, steaming mug of hot chocolate, or a comforting cup of tea. The cupcake is a ginger pumpkin cupcake with little nuggets of crystallized ginger suspended throughout. I've topped it with a delicious spiced cream cheese buttercream - it's a buttercream because I've significantly cut back on the amount of cream cheese added to the frosting, so it's just got a hint of cream cheesiness. It's my new favorite cream cheese frosting! It's spiced with cinnamon, cloves, and nutmeg. I've topped the cupcake with a hit of butterscotch. Together, these flavors round out the season! It's a taste of Autumn in each bite..


Pumpkin Ginger Cupcakes & Spiced Cream Cheese Frosting
(Adapted from Elinor Klivans' cupcakes!)
1 1/2 cups all-purpose flour
3/4 tsp baking powder
3/4 tsp baking soda
1/4 tsp salt
1 tsp ground cinnamon
1 tsp ground ginger
4 T unsalted butter, melted and cooled
4 T canola or vegetable oil
1/2 tsp vanilla extract
1 cup sugar
1 cup canned pumpkin
3 large eggs, room temperature
1/4 cup crystallized ginger, small dice
Frosting:
1 stick unsalted butter
1/4 tsp salt
3 oz cream cheese, room temperature
1 tsp vanilla
3 cups powdered sugar
2 T milk or cream
1/4 tsp ground cinnamon
1/4 tsp ground cloves
1/4 tsp ground nutmeg
Set oven to 325F. Line a muffin tin with cupcake liners. Whisk together the flour, baking powder, baking soda, salt, cinnamon, and ginger in a bowl. Using an electric or handheld mixer, blend the butter, oil, vanilla, sugar, and pumpkin until the mixture is fully combined. Add the eggs and crystallized ginger. Once incorporated, slowly add the dry ingredients until just combined.
Fill each cupcake liner with 1/4 cup of batter and place in the center of the oven for about 22 minutes or until a toothpick inserted in the middle of a cupcake comes out clean.
While the cupcakes are baking, make the frosting. Beat the butter and cream cheese until smooth and uniform. Add the salt, vanilla, spices, and 3 cups of powdered sugar, 1 cup at a time. Adust the consistency of the frosting with the milk or cream. Beat for 2 minutes.
When the cupcakes come out of the oven, leave them to cool completely. Then frost them with the frosting.
Tuesday, September 13, 2011
Changing Seasons...
Even though there is nearly a month left of summer once school begins, I am always quick to jump in to all things Autumn! Blooming Spring flowers are optimistic - a sign of rebirth and renewal. Summer sun is relaxing and lazy. Warming up near a fireplace during the first snow of Winter is cozy and homey... But my heart belongs to Autumn. Leaves turning warm colors of brown, orange, and fiery red warm my heart amid the cooler temperatures. My two favorite holidays - Halloween and Thanksgiving - make Autumn my favorite time of year. Pumpkin picking, hayrides with my husband and kids, and seeing my daughter near the top of an apple tree trying to find the largest, prettiest, reddest apple in the orchard are memories I look back on dearly.
Which is why this week, I wanted to create a cake in the spirit of Fall. The base was an orange-flavored cake with decadent chocolate buttercream. I covered the cake with a homemade chocolate fondant and decorated with flowers and leaves in warm colors.


Since my children are so into baking and this blog, I like to display their works whenever possible. They get such a rush from it and it certainly doesn't do any harm to their confidence... Earlier this week, they made peanut butter play dough and, using some rainbow jimmies, molded some beautiful and edible pieces! They spent nearly two hours working away at this dough, taking little nibbles here and there and enjoying a mellow weekend. Happy Autumn everyone!


Subscribe to:
Posts (Atom)